SI Training Resources
- Guide - Assigning Legal Interpreting Orders
- Guide - Cancelling Orders (Timely Cancellation)
- Flowchart - Legal Interpreting Order Entry & Scheduling
- Guide - Rescheduling Orders
- Guide - Disallowing Interpreters in Vendor Center
- Guide - Adding Journal Notes in Control Center
- Guide - Entering Legal Interpreting Orders
- Guide - Cancellation Options
- Guide - Removing an Interpreter from an Assignment
- Guide - Broadcasting Legal Interpreting Orders
- Guide - Creating Parent Accounts
Guide - Assigning Legal Interpreting Orders
1. Go to Order Control Center
Once an assignment is broadcast, move on to the Control Center of the order.

Tip: Another way to get to the Control Center is to click Assign Interpreter.

- DETAILS
- You will be the details tab open up. Review it before moving on to the next step.

2. Choose an Interpreter from Available Tab
Click the Available tab.
- AVAILABLE
- This shows you the interpreters that are available, meet the criteria, and who responded to the broadcast that went out notifying them of the available assignment (i.e. Assignment Offer email).
* Important * Be sure to check the profit margins to choose the best interpreter option. Profit margins should be above 40% and typically, the higher the better, while not compromising quality. In essence, it is better to choose someone who can provide a quality service (and has a good internal rating) than someone with a low rating even if the profit margin may be higher.
- This shows you the interpreters that are available, meet the criteria, and who responded to the broadcast that went out notifying them of the available assignment (i.e. Assignment Offer email).

3. Assign Interpreter
Click "ASSIGN" to confirm your interpreter selection.
- STATUS OF VENDOR
- Once you assign the interpreter, their name will be grey and there will be a red line on the left.
See the example:

* Once assigned, the interpreter will receive an assignment confirmation email *
4. Verify via Journal
Review the Journal to confirm that assignment paperwork was sent to interpreter you assigned.
Guide - Cancelling Orders (Timely Cancellation)
* Please note that the following example is for a timely cancellation. For late cancellations, please see document "Guide - Cancellation Options." *
1. Open Calendar
Navigate to Schedule tab and go to the date of the assignment you want to cancel.

2. Select Cancel
Hover over the assignment you want to cancel. This will open the Order Ribbon with the Cancel shortcut.

3. Confirm Cancellation
Click "proceed" to confirm that you want to cancel the order.

Notice how the assignment corner code color changes to charcoal grey.

4. Verify via Journal
Once cancellation was submitted, check the Journal to verify that the change was recorded and that the client and vendor received cancellation notification emails.
Bonus Tip
Need to restore the assignment? You can do that by hovering over the assignment and clicking "Restore." You will get the following pop-up. Continue to restore the assignment.

Once restored, you will see the notes on the restored assignment in the Journal Entries.
* Please note that you will need to broadcast and assign the interpreter for the order again. *
You can see an example below of an order that was restored. Check the Journal notes as a reference for all touchpoints in the order. You can also reference the Notifications inbox in Outlook as another resource for touchpoints.

Flowchart - Legal Interpreting Order Entry & Scheduling

Guide - Rescheduling Orders
1. Open Calendar
Navigate to Schedule tab and go to the date of the assignment you want to reschedule.
2. Select Reschedule
Hover over the assignment you want to reschedule. The Order Ribbon with shortcuts will then be visible. Select the Reschedule function. This will open the Order Control Center.

3. Go to Reschedule Tab in Control Center
Click the Reschedule tab.

4. Enter Reschedule Details
Enter the new date and time information before clicking Reschedule.

5. Click "Reschedule"
6. Verify via Details & Journal
Check the Details tab and Journal to confirm the change was entered properly and that the client and vendor received reschedule notifications.
Guide - Disallowing Interpreters in Vendor Center
* The following steps are only available to Admin Users. *
1. Go to Vendor Center
In the Tools and Settings tab, select Vendor Center on the left.

2. Select a Vendor
Click Edit to open the vendor's profile.

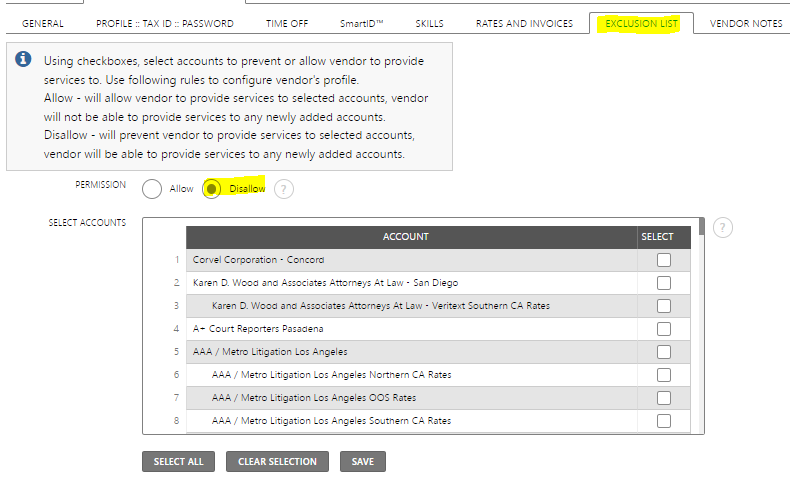
3. Update Exclusion List
In the Exclusion List tab, select Disallow. Then, select those accounts you do want to disable for the vendor. Once saved, this will prevent the vendor from receiving Assignment Offer emails for orders from the client account checked.
4. Save
Finally, click save to update the Account setting in the system.
Guide - Adding Journal Notes in Control Center
1. Open Calendar & Look for Assignment
Navigate to the assignment to which you wish to add notes.

2. Select Journal
Hover over the assignment and select "Journal."

3. Click the + to add a new entry.
When you click the +, you will see a field where you can enter your entry.

4. Select if you want to share the update with vendor, requester, etc.
* Skip this step if not applicable. * This will only apply to users who have portal access. Note that this does not send an automatic notification to whomever you are sharing the note with.

5. Save your Journal Entry
Click "save" to enter the Journal Entry in the system.

You can also easily access the Journal in the assignment Control Center, where you can see all the details related to the order/assignment. Below is an example. Click either the "Journal" button or the + sign to enter notes.

Guide - Entering Legal Interpreting Orders
1. Open the Order Intake Form with "Schedule Interpreter"
Under the Schedule tab, you will see Scheduling Tab Menu. Select "Schedule Interpreter" to get started on an order.

2. Client Details
Move on to the Request Details tab. Fill out the client information.
-
Requester
- Who is the Requester? The Requester is the main account that placed the order. This could be any of the following: court reporting company, law firm, school district, etc.
In the text box you can key in the name (you may key in a portion of the account name).

If the client does not auto-populate within this tab go to the LOOKUP tab to search by additional criteria. Follow the instructions below to add a new requester for an account.

-
- Need to add a new Requester? If the contact who placed the request is not listed Accounts click the "ADD REQUESTER" button. Key in the following details then click "ADD AND SELECT."

-
Service Account
- What is the Service Account? The Service Account is the one that will receive the service; the end client, usually the law firm. If the law firm sent a request, the service account is the law firm. Under Service Account, you will indicate the name of the handling attorney.
In the text box, type the name of the law firm and/or the handling attorney's name.
* Important * It is necessary to select a parent account (blue dot) at this point.
Service Accounts always have a blue dot and must be selected here for the order to be entered properly.

-
BILLing Account
- What is the Billing Account? This is the account that will receive the invoice for our services.
- Select the "BILLING ACCOUNT" box whether billing a insurance company or the law firm directly. Once that box is selected the a drop down menu for the Bill To Account will appear.
- When we need to bill a third party, such as an insurance company, the billing account is the insurance company. If we are not billing a third party (i.e. insurance company), you will use the law firm's subaccount (i.e. Law Firm - Southern CA Rates).
- You must choose an account with Rates for their rates to be entered for invoicing.
In the text box you can key in the Insurance Company name. Can't find an adjusters or billing contact name? Use the LOOKUP tab to search for an adjuster.

* Important * It is necessary to select the correct subaccount under the parent account. Below you will see the parent account (blue dot) and the subaccount that shows the rates that are to be billed (grey dot).
Billing Accounts always have a grey dot and must be selected for the correct rates to pull up at the time of invoices.

3. Assignment Details
Fill out the order information.
-
type of service (On-site or remote)
- Select the button that indicates what the client requested.
For on-site interpreting, use OSI, which stands for On-site Interpreting.

For remote interpreting use VIS, which stands for Virtual Interpreting Service.

Please note: later in the order form, you will need to select the conference platform if the order is for a remote interpreting assignment.
-
assignment date
- Use the dropdown or the calendar to select the date of service.

-
start time
- Use the dropdown or key in the start time.

-
estimated length
- Use the dropdown or key in the start time.
* Important * Be mindful of the duration while maintaining half day and full day hours. You will need to pay close attention to the assignment type when properly entering the duration.
-
language
- Keep English as the source and enter the language requested as the target language.

-
assignment type
- Format of selection will be Calendar Type+ Assignment (example: Spanish Legal:: Deposition).
-
CASE NAME
- Fill in Case Name by only capitalizing the proper names (example: Smith vs. Starbucks).
-
lep name, case number, file number, date of loss/injury
- Fill these in as needed.
-
Locations
- Use the dropdown or key in a portion of the address.
* Important * Remote Interpreting (VIS) orders must indicate the Virtual Interpreting Service under Locations.

-
notes for interpreter
- Include important or additional notes for the interpreter.
-
internal order notes
- Add any notes you want to be visible for staff.
4. Interpreter Qualifications
Fill out interpreter requirements.

5. Submit
Click submit to complete order entry.
You will see the order confirmation afterwards. See example below.
When you see this screen, it means that the Client Confirmation email has been sent to the client who placed the order (Requester).
Next we will move on to broadcasting and then, assigning the order.

Guide - Cancellation Options
1. Go to Order You Want to Cancel
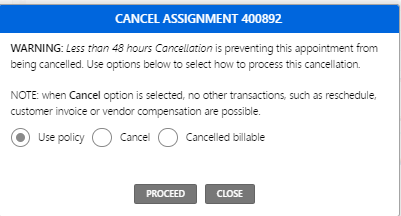
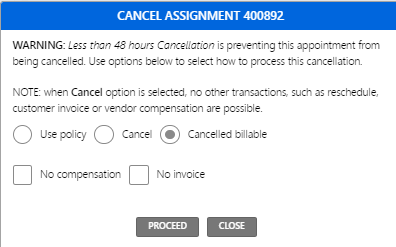
Once you click "Cancel" you will get the following options: Use Policy, Cancel, and Cancelled billable.
If you do not see the three options, the Account settings may need to be updated in Account Center.
* Do not use the following Policy option until you have received the greenlight. For now, disregard this option. *
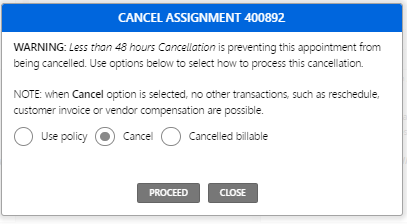
2. Select an Option from "Cancel" or "Cancelled billable"
Select Cancel for a Timely Cancellation.
This will cancel the order/assignment and will not transfer any of the order information over to the Accounting Review Center, meaning Accounting will not be able to bill the timely cancellation.
Select "Cancelled billable" for Late Cancellations where we will bill the client.
The interpreter can bill and the client will receive an invoice.
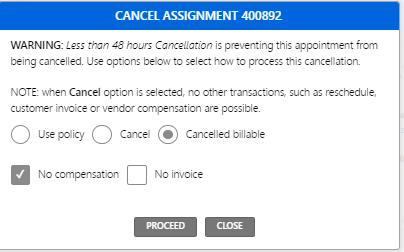
Select "Cancelled billable" and "No compensation" for Late Cancellations where we will not pay the vendor (interpreter).
If the interpreter informs you that they will not bill for the late cancellation of an assignment, the "No compensation" selection will tell the system to not expect an invoice for the interpreter's services.
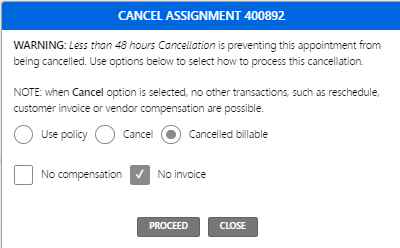
Select "Cancelled billable" and "No invoice" for Late cancellations where we will not invoice the client (i.e. Non-billables).
Some clients have policies that do not allow us to bill them for Late Cancellations. When the cancellation is a Late Cancellation, we are expected to pay the vendor (interpreter), but we cannot invoice the client. In this case, you will need to select the following. This scenario where we lose money because of the above combination is also known as a "Non-billable."
3. Click "Proceed" to Record Your Cancellation
4. Verify via Journal
Once cancellation was submitted, check the Journal to verify that the change was recorded.
Guide - Removing an Interpreter from an Assignment
1. Go to Order Control Center
Go to the Control Center of the order.
2. Select "Remove Interpreter" in Details tab.

- REMOVE VENDOR POP-UP
The following pop-up will appear. Click "Remove Only" if you would like the interpreter to remain available. If you would like the system to know that the interpreter is Not available, select "Remove and Change Status."
Once you remove the interpreter, you can reassign to anyone from the Available tab again.

* Note that the interpreter you initially removed will not receive a notification that they have been removed. You will need to confirm with them manually by email that they have been removed. *
3. Verify via Journal
Once interpreter has been removed, check the Journal to verify that the change was recorded.
4. Proceed to Assigning Replacement
Your assignment is open (not assigned) again.
You may need to rebroadcast the assignment to send out Assignment Offer emails to interpreters who qualify for the assignment. You will then proceed to cover the assignment as usual.
Guide - Broadcasting Legal Interpreting Orders
1. Navigate to Broadcast Buckets (Sidebar)
Go to the Sidebar on the bottom left of the screen in your Dashboard View.

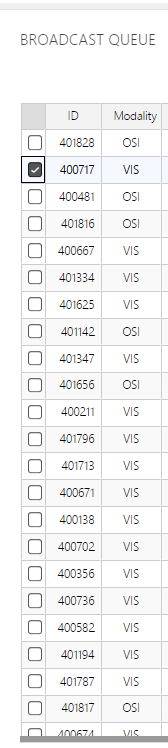
2. Select Broadcast Queue Bucket
This is where you will usually go to broadcast your orders and send out Assignment Offers.

3. Review the Queue
Look for your orders that need to be broadcast in the queue.
4. Select and Broadcast
Select the Order you want to broadcast, meaning you want to send a notification that the assignment is available.
5. Broadcast Selected
On the lower right corner of the Broadcast Queue, select "Broadcast Selected."
This will broadcast the order and an Assignment Offer email will be sent to the interpreters who qualify for the assignment.

Guide - Creating Parent Accounts
* The following steps are only available to Admin Users. *
1. Go to Tools and Setting Tab
Navigate to the top menu in ScheduleIntepreter.

2. Navigate to Account Center
View the sidebar menu under Accounts and Users.

- QUALITY CONTROL CHECK
Key in the name of the account you will be adding before adding the account. This is to double check that the account is not already in our system and will prevent any duplicates. If nothing comes up, proceed to the next step.

3. Select Add New Account
* Tip: Gather all account information ahead of time to make this step more efficient *

4. Fill Out Necessary Fields
* Do not click on Sub Account *

- ACCOUNT NAME
- Enter the name and city with a dash as a separator (Example: Account Name - City)
- ACCOUNT NAME QUICKBOOKS
- This will be generated automatically and should remain blank. Disregard unless instructed to overwrite the default.
- ACCOUNT TYPE
- Choose an option that states the type of organization only (not including "Rates" or other information), such as "Law Firm," "Insurance Company," "School District," or "Court Reporting Agency."
- COUNTRY
- By default, this will be United States.
- ADDRESS INFORMATION
- Fill out street address, suite, building floor, city, state, zip code
- TIME ZONE
- Be sure to select the correct time zone as clients could be in other time zones.
- LOCATION IS OBSERVING DAYLIGHT SAVING
- This is checked by default. Leave as is unless instructed to change.
4. Submit
5. Navigate to Users Tab
You will add Users (Client Contacts) in the following tab. This is the only place where you can manage Users (i.e. Requester, Attorney, etc).

To add a new user, select Add New User.

The following is an example of a completed User profile with all the necessary fields and correct formatting.
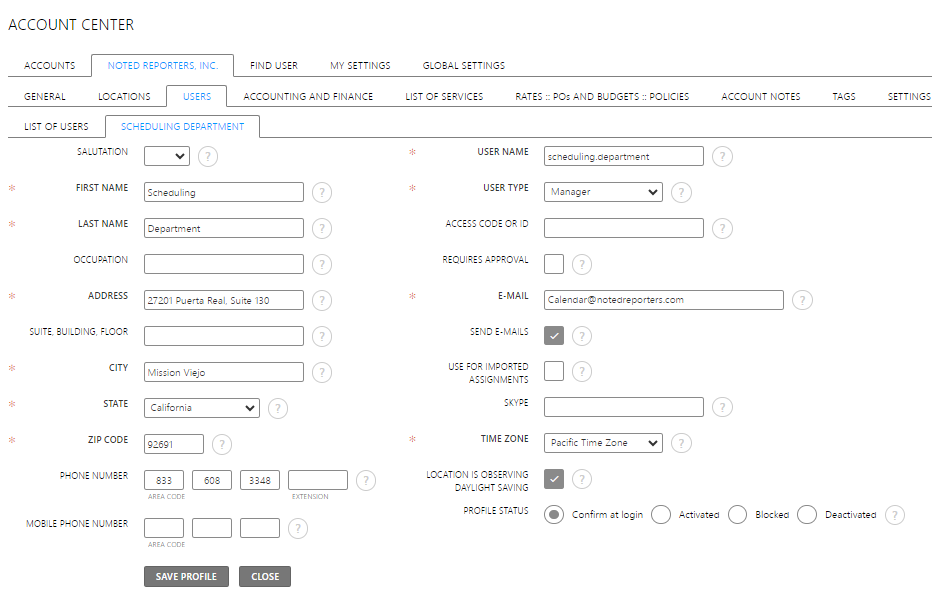
- FIRST NAME, LAST NAME, ADDRESS, CITY, STATE, ZIP CODE, PHONE NUMBER
- Fill this out as usual
- You will notice in the example above, that the User profile that is used for a Department here is the Scheduling Department.
- USERNAME
- Follow this format: first name.last name (i.e. "scheduling.department" for the example above)
- USER TYPE
- Always enter "Manager" for the User Type.
- EMAIL & SEND E-MAILS
- Enter the email as usual
- Be sure to select "Send E-mails" or the User will not receive automated notification messages from SI.
- TIME ZONE
- Fill out as usual.
- LOCATION IS OBSERVING DAYLIGHT SAVING
- This is checked by default. Leave as is unless instructed to change.
- PROFILE STATUS
- Choose "Confirm at login"
- PASSWORD SETTINGS
- You will need to set up a password for the new account.
- Copy/paste the following into both Password and Confirm Password fields: Si2023.onbrd
** After you review the above, you can click Save **
6. Review Settings (Documents and Conference Platforms) Tabs
Navigate and complete the following to finish setting up the Parent Account.
- DOCUMENTS > INTERNAL SERVICE REQUEST TEMPLATE
- For Calendar/Legal, confirm that this form is set to "Legal Interpreting"

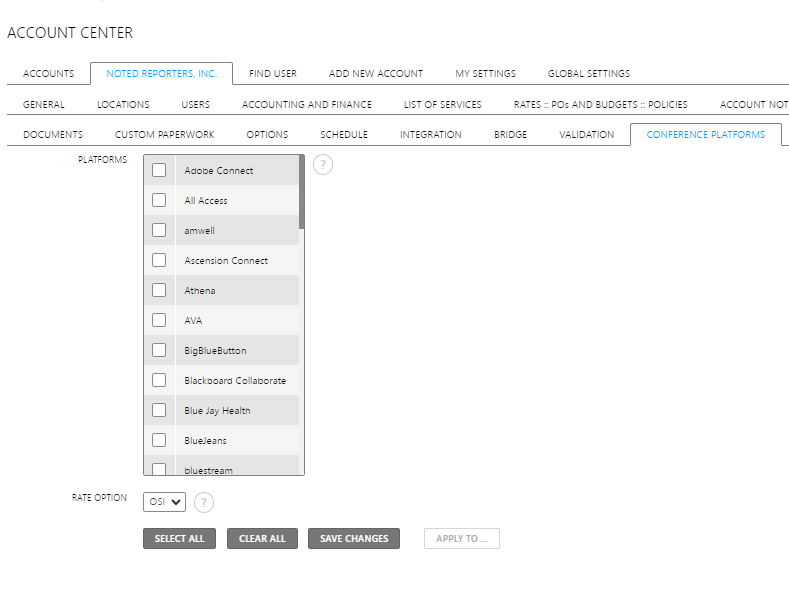
- CONFERENCE PLATFORMS
- The following platforms will be added automatically: Google Meets, Microsoft Teams, RingCentral, Zoom. Review that this looks good before saving your changes.